How to geotag photos on Google My Business

Improving your SEO ranking on Google My Business is the best way to reach your target market and start attracting new customers to your business. If a potential customer searches for you, or your product/service on Google, you want them to be able to find you! That is why SEO is so important.
Images are a significant part of SEO, as they are the first thing people will see when searching for your business. But beyond the aesthetic purpose of quality images, they can directly impact your SEO ranking. Using optimized images on your Google My Business profile is essential to the success of your business. And one of the ways you can optimize them is by geotagging. So, how can you add geotags to your Google My Business photos? Read on to find out.
5 steps to geotag photos on Google My Business

Once your images are uploaded to Google My Business, there is no direct way to geotag them on the platform. You will need to add geotags to your photos before uploading them. Some photos will already have geotags based on where they were taken, and others may have no tag at all. Regardless, adding a new geotag will enable you to choose the exact location attached to the photo so you can ensure it's the same as your Google My Business address.
- Upload your photo to GeoTagSeo
- Geotag your business location
- Edit the image title and meta description
- Apply changes and download your photo
- Upload the image to your Google My Business account
Now let's look at these five steps more in detail.
Missing Location in your images?
Adding meta tags to your images improves search engine performance greatly!
Try It for Free!
1. Upload your photo to GeoTagSeo
There is no way to manually add a geotag to your photo for Google My Business. You will need to use a tool like GeoTagSeo to alter and optimize your photo metadata. Head to GeoTagSeo.com and upload the photo you want to tag. GeoTagSeo supports JPG, PNG, and WebP formats.
2. Geotag your business location
Next, you need to choose the location you'd like to tag. You can either type in the location or use the map to zoom in and choose it manually. The location you use for the geotag must be the same location linked to your Google My Business account. That is because when Google reads the data, they will prioritize your photo in search because they know it was taken at your business.
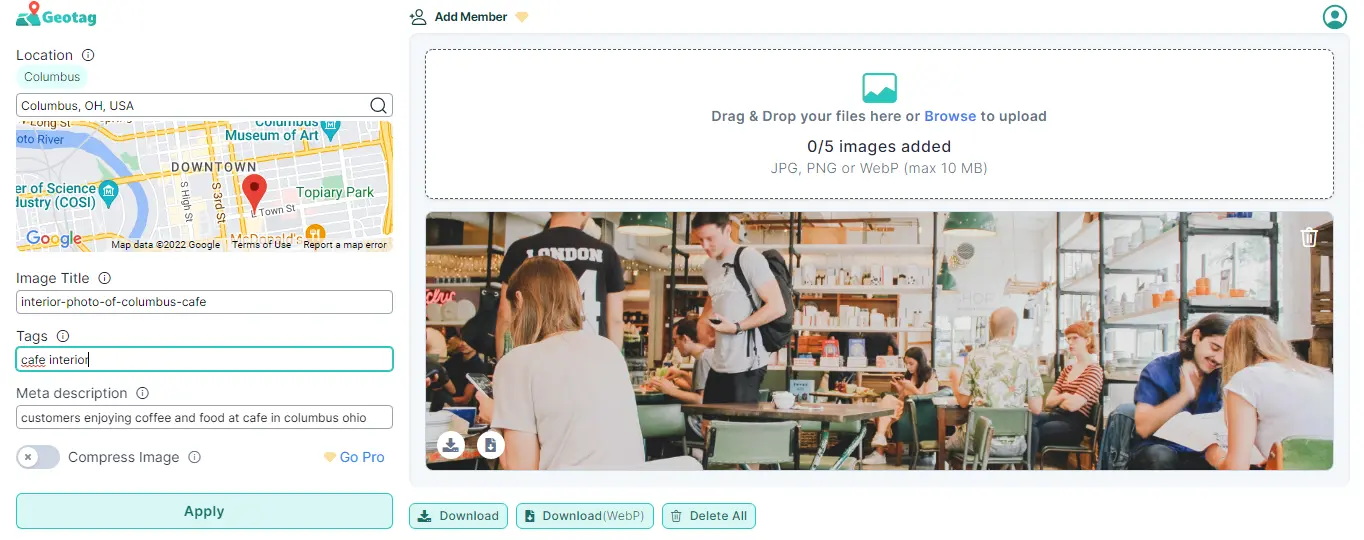
3. Edit the image title and meta description
Geotags aren't the only pieces of data that Google reads. Since Google can't see what is visually in the photo, you need to provide that information for them. And you can do that through your image title and meta description. Your image title should be a maximum of six words and contain keywords related to your business. Not only with the title make it easier for you to organize and find your images, but it will also give Google an idea of the context. You can also add a meta description, which is the place to provide a more in-depth explanation of the context of your image.
4. Apply changes and download your photo
Once you've added the geotag, title, and meta description, you can click "Apply" and then download your optimized photo to your computer or other device.
5. Upload the photo to your Google My Business account
Head to your Google My Business dashboard and click on "Photos" in your menu. Choose the category of the photo you'd like to add or choose "cover photo" if you want to use the photo for your cover image. The photo will now have your geotag embedded into the metadata, meaning it can start helping you build that valuable local SEO traffic.
How to geotag photos from a computer
Regardless of whether you have a PC or macOS, you can follow the same steps above to geotag your photos. If you want to check the current geotags on your photos, or double-check them after you complete the process above, here is how you can find the geotag on both PC and macOS:
PC:
To find the geotag of your photo on PC, simply right-click the photo thumbnail and select "Properties." In the Properties menu, you will see a tab labeled "Details." Click this tab and scroll down until you see the heading "GPS," and you will find your photo's latitude and longitude coordinates.
macOS:
To find the geotag of your photo on macOS, open the folder containing your photo. Right-click the photo and choose "Get Info." Underneath the heading "More Info," you should see the geotag coordinates.
How to geotag photos from a smartphone
You can also geotag your photos directly from your smartphone. GeoTagSeo works on your smartphone's mobile browser, just as if you were using it on your desktop. The only difference is that when you upload your photos, you can choose from your camera roll or take the photo live. You can follow the same steps to geotag as we listed above. The exact process applies whether you're wondering how to geotag photos from an iPhone or how to geotag photos from an Android.
If you want to look at the current geotag on your photo via your smartphone, here are the steps to do it:
iPhone:
Open your photos and click on the photo you want to check. Swipe up on the image, and you will see a map showing where the photo was taken.
Android:
Open your photos and click on the picture you want to check. Click the three dots to pull up the menu and click on " Details." From here, you'll see a map that pinpoints the geotag of your photo.
Geotagging photos for Google My Business
Geotagging your photos for Google My Business is a great way to help boost your business ranking. While you can't add geotags directly in your Google My Business account, you can use these steps to geotag your photos before uploading them to the platform.