How to extract geotag from a photo
There are various reasons why you may want to extract geotag from photos. You may want to find out exactly where a photo was taken so you can bookmark the location. You may also want to extract the geotag so you can alter it and change it to your chosen location. Lastly, you may want to remove the geotag entirely for privacy reasons.
Whatever reason you are looking to extract geotags from your photos, this article will tell you exactly how to do it.
From a computer
The easiest way to extract a geotag from your photo is on your computer. Now bear in mind that not all photos are automatically geotagged. That will depend on the device used to take the photo. Here are the steps to extract a geotag from your photo using a PC:
- Open the folder containing your photo
- Right-click on the thumbnail and choose “Properties”
- In the Properties windows, you’ll see four tabs: General, Security, Details, and Previous Versions. Choose “Details”
- Scroll down until you see the header “GPS”
- Underneath this header should be the Latitude and Longitude of your image. This is the exact geotag of your image.
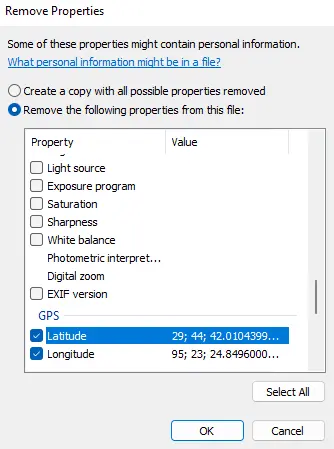
You won’t be able to alter this geotag from the Properties menu. But you can remove the geotag by clicking “Remove Properties and Personal Information” and selecting “Remove the following properties from this file.” Scroll down until you see the GPS coordinates, tick the boxes for Latitude and Longitude, then click “OK”.
If you are trying to extract the geotag on MacOS, here are the steps to do it:
- Open the folder containing your photo
- Right-click on the photo and choose “Get Info”
- Underneath “More Info,” you’ll find the geotag (if there is one)
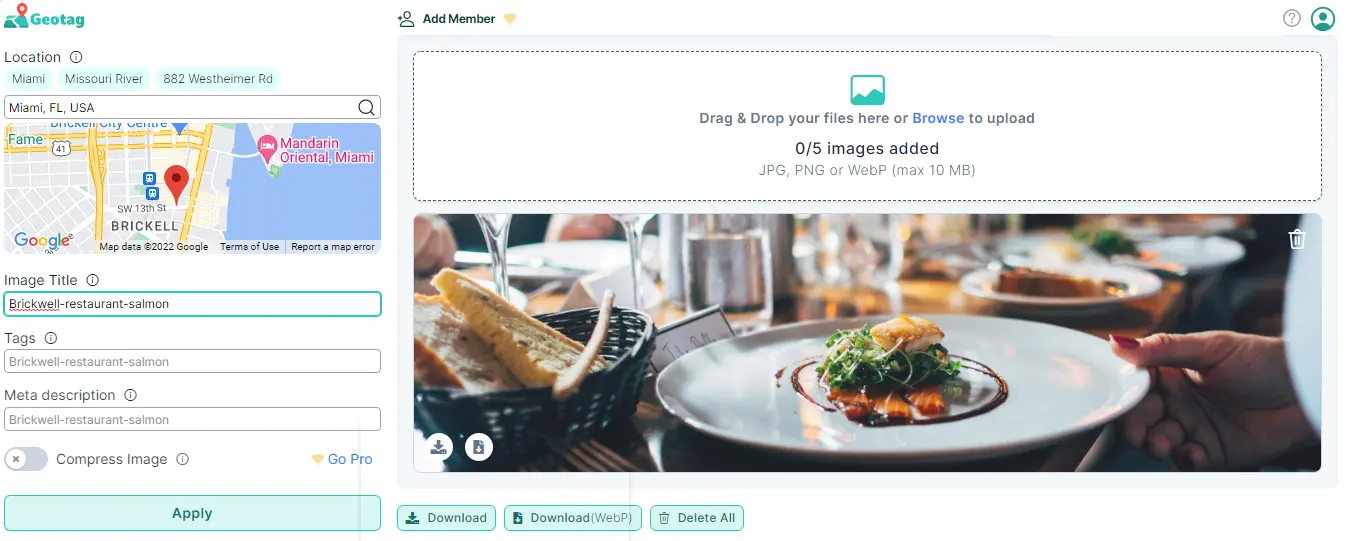
Suppose you want to alter the geotag from your computer. In that case, you will need to use a tool like GeoTagSeo, which will allow you to choose different coordinates by entering the exact location you’d like to tag, for example, your business address.
From Google My Business
If you’ve already uploaded your photos to Google My Business, then there is no way to tell from within GMB if your photos have been geotagged or not. You cannot extract geotag information on Google My Business, but you have two options to ensure your photos are geotagged.
The first option is to check the original photos you uploaded if you still have them saved on your computer or smartphone. If you still have the originals, you can go to the image properties/info using the steps above to check if there are GPS coordinates.
If you no longer have the original Google My Business image file, you cannot extract the geotag, but you can download the image, add a geotag and reupload it. But the process of doing so isn’t very straightforward. You cannot download pictures from your Google My Business profile. Instead, you need to download them via Google Maps. First, find your business profile on Google Maps. Once you do so, you can click on the images and choose the image you want to download. Then click “Report a Problem,” but before reporting any problem, you can right-click on the image and download it. One thing to note about this process is that it may reduce the quality of the picture. From there, you can use a tool like GeoTagSeo to geotag the image and reupload it to your Google My Business profile. Make sure that you delete the old one if you go this route.
From Facebook and Instagram
Facebook will automatically extract GPS coordinates every time that you upload a photo. If you’re uploading from your smartphone or computer, Facebook will allow you to tag your location and give recommendations based on the geotags in your photo. Once uploaded, Facebook strips the backend GPS metadata from the image, so if you downloaded a photo from Facebook in hopes of extracting the geotags, you won’t be able to. Your only hint to the geotag of other people’s Facebook images will be if the photo has a location tag.
The same information applies to Instagram images. When you upload a photo to Instagram, the platform will suggest potential location tags based on your geotag. But once you upload the image, all that data is stripped, so no one will be able to extract geotags from your photo after the fact. All that will remain is the location tag you added to the image.
If you don’t want Facebook or Instagram to have your geotags when you upload your photos, you will need to remove them manually before uploading the photo.
How to find geotag on photo
Finding the geotag on a photo is very straightforward. Let’s look at where you can find a geotag on a photo.
On a PC:
If your photo is on a PC, you can find the geotag by right-clicking the image, then clicking “Properties.” In the “Details” tab, you’ll see a section called GPS, which includes Latitude, Longitude, and Altitude (if there is one tagged).
On macOS:
If your photo is on macOS, you can find the geotag by right-clicking the image and then choosing “Get Info.” In the info screen, you should see a section labeled “More Info,” where you can find the Latitude, Longitude, and Altitude (if there is one tagged).
How to tell if a photo is geotagged
How do you know if your photo is geotagged or not? Here is the way you can check both on your computer or smartphone:
1. From a computer
Follow the above steps on either PC or MacOS to find the geotag on your photo. If you’re on a PC in the Properties menu and do not see a heading labeled “GPS,” then your photo is not geotagged. This can occur if the photo is downloaded from the internet, sent from someone who has removed the geotag, or if it’s a screenshot.
If you use macOS, you can find the geotag in the “More Info” section of your images’ metadata. Your photo is not geotagged if you don’t see Latitude or Longitude here.
2. From a smartphone
Using your smartphone, you can tell if your photo is geotagged. If you’ve taken the picture on the device, then the image should have a geotag. The exception is if the photo is downloaded or if it’s a screenshot. To see if your photo is geotagged on an iPhone, simply open your Photos app, click on the photo, and then swipe up. A map will appear, showing you the geotag of your photo, and you use your fingers to zoom in or out.
If you have an Android smartphone, click on the photo and then click on the three dots to pull up your menu. Choose “Details,” where you will be shown a card with a map, complete with GPS coordinates and other information about your image.
In both cases, the photo doesn’t have a geotag if there is no map.
Extract geotags from photos
Extracting the geotags from your photos is beneficial for many reasons. It provides an opportunity to optimize your photos when using them for business purposes, such as Google My Business or your business website. And it can also help you protect the privacy of your personal photos. Using these guidelines, you can extract geotags in various ways.
Missing Location in your images?
Adding meta tags to your images improves search engine performance greatly!
Try It for Free!